Showing posts with label travel. Show all posts

Monday, August 16, 2010

A Meal to Follow a Road Trip

As some of you may know, Elspeth and I just went on a fabulous road trip. I flew to Seattle, we rented a car, and we drove back to Minnesota, meandering through Yellowstone and Grand Teton National Parks, the Black Hills, and the Badlands (also a National Park) along the way. We slept in a tent all but one night (we splurged on a bed and breakfast in Douglas, Wyoming - which may, as it happens, have the saddest downtown in the western United States), and not even one bear tried to eat us. Growing up in Maine, I suspect we didn't imagine that in 2010, driving between the two cities that we feel so comfortable in would involve seeing most of Washington, some of Idaho and Montana, most of Wyoming and South Dakota, and a pretty serious chunk of Minnesota, as well. There are a lot of mountains along the way, and deserts, too. There are cowboys and rodeos and some rolling plant that may have been tumbleweed. There are some particularly grand rivers, and a whole lot of empty fields. I highly recommend the route that we took (which was cleverly planned, down to the very last detail, by Elspeth!).

We ate well along the way (Elspeth brought along homemade chili, and pasta, and risotto(!!) for campsite dinners), and our only fast food stop was a "lunch supplement" as we called it, at an Arby's in central Wyoming on Thursday. In South Dakota on Saturday morning, we ate sourdough pancakes from a recipe that claimed to use a sourdough starter from frontier times, "over a hundred years ago"! All the same, when we arrived in Saint Paul on Saturday night, we were hungry. We swung by the Seward Co-op to get a few essentials, and when we got home, I whipped up a quick dinner. Tortellini (cheese-filled, from the grocery store freezer), with garlic scape pesto (homemade, and stored in my freezer... I'll have to blog about that recipe later), and lots of shredded parmesan stirred in.

What we really wanted, though, after driving 2500+ hours in 6 days, was a salad.

Fresh greens, with an heirloom tomato sliced on top, dressed with an easy and delicious recipe - it's one I wrote down a few years ago from that Everyday Italian show on the Food Network, and as you can see here, I wrote it on cute recipe cards that Elspeth decorated for me as a gift one year for Christmas. As you can also see here, I make this dressing often enough that there's a smudge on the recipe card!

In case you can't quite see it: that is 4 Tbsp of white vinegar, 2 Tbsp of dijon mustard, 2/3 cup of olive oil, and 1 tsp oregano. In this case, I put in a pinch of dried oregano and a pinch of dried basil. And it's true - the recipe makes plenty of dressing. I have a small jar of it in the refrigerator now, which will last through the week!

Sunday, December 13, 2009

Happy Holidays from Seattle!


Well, the holidays are upon us! Hanukkah began Friday night and Christmas is just around the corner. While Sarah was visiting me for Thanksgiving, we went to two, yes, two(!) tree lighting
ceremonies, which was a great way to ring in the holiday season. The Westlake Center tree lighting was quite the ta-do, with 5th Avenue singers, three different choirs (mens, womens and children's) and a fireworks display at the end.The Pike Place Market tree lighting was a bit more modest, but much more charming. They both were fantastic in their own way!


The Space Needle is also festive, with lights on top as well as a display at the base, with bright spheres making up the shape of a tree, very pretty!
I've also been busy decorating the places I spend most of my time, so I thought I'd share some pictures of holiday spirit, courtesy of me, at my office and in my apartment. This is my first year having my own Christmas tree, and it's so nice to have! My friends were kind enough to go get me one, which made life a lot easier. Trees in the city are hard to find and fairly expensive! They got me a nice 4 1/2 foot tree for $20 at Lowes, which as a relief because I was planning to pay $25-$30 for a 3 foot tree right in the city. I'll post pictures from my office and home in a post to follow...too many pictures already!

Monday, November 2, 2009

Razor Clams - From Beach to Plate!

Whew. I'm a bit behind on posting, so if all goes as planned, there will be a 3 or 4 catch up posts in the next few days. If my grade school art teacher, Mrs. Turcotte, were here, she would pull out the huge cardboard cut out of a ketchup bottle, and then we'd all get to work catching up. But anywho.

A few weeks ago a group of us went out to my friends family beach cabin on the Washington coast. For the record, it's my favorite spot to be on the West Coast. When we were there in April, it was the official 'Razor Clam' season and we woke up to dozens of personal planes, a scattering of helicopters and many a 4 wheel drive vehicle on the beach, accompanied by a bajillion people digging for razor clams. A few friendly clammers showed us their loot and we were certainly impressed - the clams were huge!

This time around, the personal planes weren't there, but as the tide went
down we noticed a bunch of locals headed out to the beach to dig for clams. We thought, hey, we should give it a go! So we headed out to
the beach with our snazzy clam digging piece of metal and tried our luck. The first few holes provided us with some funny looking shrimp things, or nothing at all...making us a bit nervous about our prospects, but we persevered and headed out closer to the edge of the water and sure enough, we started getting clams! To 'dig' for the clams, you take the metal cylinder (shown here) and wiggle it with all your might straight down into the sand over an air hole. You cover the two metal holes with your fingers and you pull with your whole body, till you've got the cylinder out of the sand. You release your fingers, releasing the suction, and dump the sand out. If all goes as planned, there's a nice big razor clam in the middle of it!
Once we got our fair share of clams (not many, as we didn't quite expect to actually be successful), we headed back to the house. Our friend with an iPhone managed to get reception for JUST long enough to read the first few paragraphs of 'How to Clean a Razor Clam', which proved very helpful. We soaked them in freshwater to purge the sand, dropped them in boiling water for 7-10 seconds to release them from their shells, cut the 'razor' off as well as the black tip of the foot and the guts, then sliced them in half. We then sauted them with butter, lemon and salt and pepper (I believe). The final product was a bit iffy. We let them overcook a bit, and in our nervousness to taste them, let them cool off a bit too...so they weren't the most delicious thing I've ever eaten, but you could tell they COULD be good, if done correctly.


The point is. We dug those clams ourselves. Yeehaw!

Friday, August 7, 2009

A food filled trip to Maine!


Well, Sarah and I had a great vacation! She drove to Chicago, while I flew, and then together we drove to Maine, with stops in Ohio for a wedding, Pennsylvania to visit a friend and Connecticut for a family pig roast. What a crazy drive! We explored Columbus by car (fascinating city!), discovered a great pizza place in charming Cambridge, OH and learned of the beauty of northern West Virginia and western Pennsylvania. Did you know that you have to drive through West Virginia to get from Ohio to Pennsylvania? Neither did we! As you can see, we were welcomed by many a state!

Anyway. There are two things I love to eat in Maine.
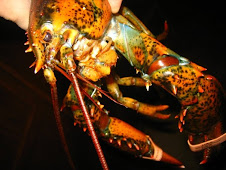
Lobsters and blueberries. Stereotypical I know, but hey. There's a reason we're known for them, they're both delicious and bountiful! So. Lobster we ate. Lot's of it! We had lobster rolls (exactly what they sound like. It's essentially a toasted hot dog bun with the meat from an entire lobster, if not more, piled on top. If you want, they'll give you a side of mayo to do as you wish), lobster salad, plain old delicious steamed whole lobsters, and more lobster rolls. Delicious. delicious, delicious!

As for the blueberries. Ohhh did we eat blueberries. I was initially a bit worried about the blueberry prospects. Maine has had the rainiest, stormiest, wettest summer ever. There has been very little sun, and my dad warned me that it wasn't a great blueberry season. When I went out to my favorite spot in our blueberry field, I found maybe 10 blueberries. And it's not like there were a million little ones, just 10 that were ripe, there were maybe 15 more on their way. Oy! I was devestated. But then we hiked. We climbed to the top of Bald Mountain (a favorite local mountain) and boy oh boy oh boy! Blueberries galore! What little sun they'd had must have warmed up the rocks and warmed up the blueberries, or something. Or perhaps because the blueberries were growing on crevices in rock, the rain drained well. I don't know, but the blueberries were great, I was picking them by the handful, and they were so tasty! Later on, Sarah and I went to a field that always has blueberries, and the blueberries there were a lot better too. Not like on top of Bald Mt, but certainly good enough that Sarah and I managed to pick 4 or 5 cups...enough to make (drumroll please....) BLUEBERRY COBBLER!!!
Hooray! I was perusing the cookbooks in the kitchen and lo and behold a teathered and worn index card with a recipe for blueberry cobbler, in my sisters handwriting, fell out of one of the cookbooks. Excellent! The only problem? It was pretty vague. No mention of how many berries the recipe was for, or what size dish, not much at all. But. We tried it out, determined that perhaps half the amount of berries would have been better for the amount of topping, but who wants half the berries? Not I! So. Here follows the recipe for an 8" x 8", 4 cups of blueberries, blueberry cobbler!

Crust: 1 cup flour, 1/2 cup sugar, 1 1/2 t baking powder, 1 1/2 t salt, 1/2 cup milk, 1/2 cup butter. Filling: 3/4 cup sugar, 3 t corn starch, 1/2 t cinnamon, 1/4 t nutmeg. Directions: Stir filling mixture with approx 4 cups of blueberries, and pour into an ungreased 8" x 8" pan. Stir together crust ingredients and spoon over berry mixture. Try to spread evenly, but precision isn't a huge deal, it's going to be delicous no matter what! Cook at 375 degrees for 25-35 minutes, or until crust looks cooked through but still soft. Let cool. Honestly. The berries will be VERY hot, and the juices need time to firm up a bit. So. Be patient, let cool for a bit, and then....enjoy!!!